Instalar Jibri
Contents
En este artículo abordaremos la instalación y configuración de un proxy reverso para disponibilizar un servidor de videoconferencias Jitsi Meet detrás de un servidor nginx funcionando como proxy reverso con certificado TLS.
Para esta implementación partimos de este esquema, a esto queremos llegar.
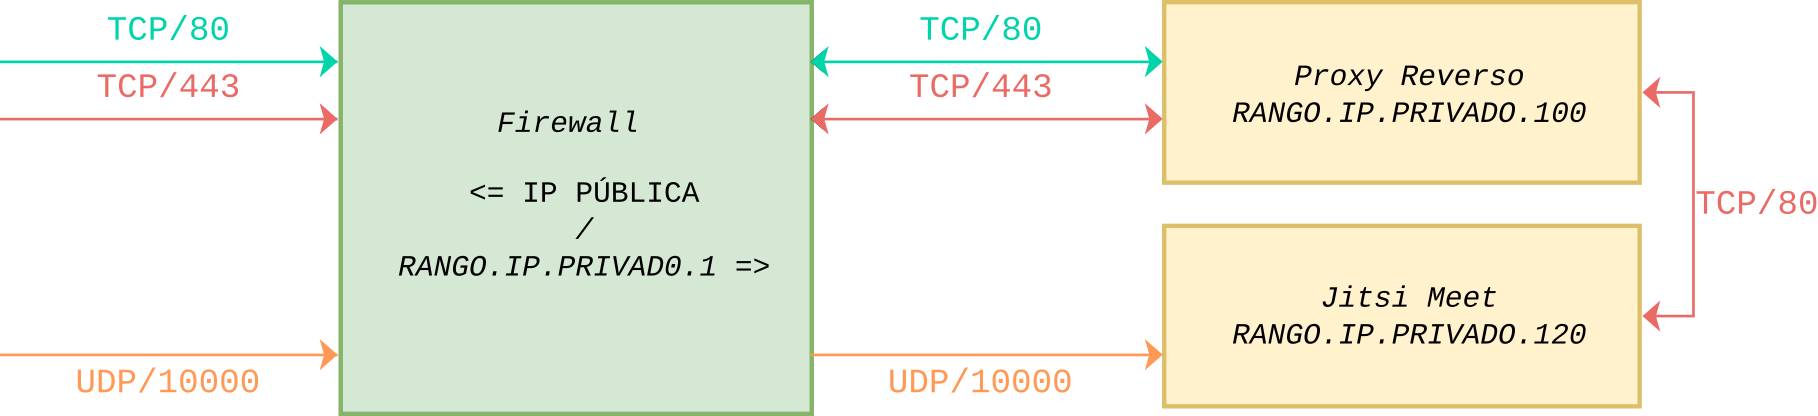
Para este ejemplo definimos un registro tipo A en el DNS para el dominio jitsi.dominio.edu.ar usando la IP pública del servidor
En todos los caso el sistema base es Debian 11 Bullseye, nos cercioramos que se encuentre actualizado y que los paquetes necesarios estén instalados.
$ apt install apt-transport-https gnupg2 curl
Nota:
Se debe utilizar OpenJDK 11.
Esto lo hacemos en el proxy reverso dado que a futuro podemos disponibilizar otros servicios.
$ apt install nginx-full
Luego de finalizada la instalación, verificamos que el servicio está funcionando.
$ systemctl status nginx
Salida
● nginx.service - A high performance web server and a reverse proxy server
Loaded: loaded (/lib/systemd/system/nginx.service; enabled; vendor preset: enabled)
Active: active (running) since Wed 2021-09-17 04:23:45 UTC; 4min 23s ago
Docs: man:nginx(8)
Main PID: 3942 (nginx)
Tasks: 3 (limit: 4719)
Memory: 6.1M
CGroup: /system.slice/nginx.service
├─3942 nginx: master process /usr/sbin/nginx -g daemon on; master_process on;
├─3943 nginx: worker process
└─3944 nginx: worker process
As you can see above, the service appears to have started successfully. However, the best way to test this is to actually request a page from Nginx.
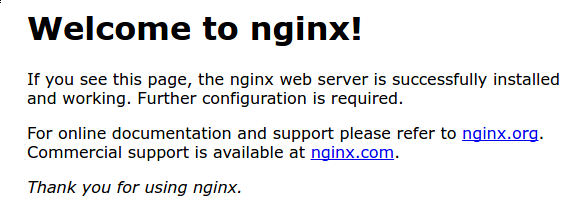
Para verificar que el software se está ejecutando correctamente navegamos a la dirección IP de nuestro servidor:
http://127.0.0.1
Deberías ver la página de inicio de Nginx:
Vamos a eliminar la configuración predeterminada
$ rm /etc/nginx/sites-available/default

$ rm /etc/nginx/sites-enabled/default
Y ahora, crearemos una nueva
$ nano /etc/nginx/sites-available/jitsi.dominio.edu.ar.conf
Donde agregaremos los parámetros necesarios para nuestro jitsi
types {
application/wasm wasm;
}

server {
listen 80;
server_name jitsi.dominio.edu.ar;
server_tokens off;
# Don't show the nginx version number

include /etc/nginx/snippets/location-letsencrypt.conf;

return 301 https://$server_name$request_uri;
}

server {
listen 443 ssl http2;

server_name jitsi.dominio.edu.ar;
server_tokens off;
# Don't show the nginx version number

include /etc/nginx/snippets/location-letsencrypt.conf;

ssl_certificate /etc/letsencrypt/live/jitsi.dominio.edu.ar/fullchain.pem;
ssl_certificate_key /etc/letsencrypt/live/jitsi.dominio.edu.ar/privkey.pem;

# Mozilla Guideline v5.4, nginx 1.17.7, OpenSSL 1.1.1d, intermediate configuration
ssl_protocols TLSv1.2 TLSv1.3;
ssl_ciphers ECDHE-ECDSA-AES128-GCM-SHA256:ECDHE-RSA-AES128-GCM-SHA256:ECDHE-ECDSA-AES256-GCM-SHA384:ECDHE-RSA-AES256-GCM-SHA384:ECDHE-ECDSA-CHACHA20-POLY1305:ECDHE-RSA-CHACHA20-POLY1305:DHE-RSA-AES128-GCM-SHA256:DHE-RSA-AES256-GCM-SHA384;
ssl_prefer_server_ciphers off;

ssl_session_timeout 1d;
ssl_session_cache shared:SSL:10m; # about 40000 sessions
# Defining option to share SSL Connection with Passed Proxy
ssl_session_tickets off;

add_header Strict-Transport-Security "max-age=63072000" always;
set $prefix "";

ssl_dhparam /etc/ssl/dhparams.pem;
ssl_ecdh_curve secp384r1;

location / {
ssi on;
proxy_set_header X-Forwarded-For $proxy_add_x_forwarded_for;
proxy_set_header Host $http_host;

proxy_pass http://RANGO.IP.PRIVADO.120/;

# WebSocket support
proxy_http_version 1.1;
proxy_set_header Upgrade $http_upgrade;
proxy_set_header Connection "upgrade";
}

location ~ ^/(?!(http-bind|external_api\.|xmpp-websocket))([a-zA-Z0-9=_äÄöÖüÜß\?\-]+)$ {
rewrite ^/(.*)$ / break;
}
# BOSH
location /http-bind {
proxy_pass http://RANGO.IP.PRIVADO.120:5280/http-bind;
#IP servidor jitsi
proxy_set_header Host $host;
proxy_set_header X-Forwarded-For $proxy_add_x_forwarded_for;
proxy_set_header X-Forwarded-Proto $scheme;
proxy_buffering off;
tcp_nodelay on;
}
# xmpp websockets
location /xmpp-websocket {
proxy_pass http://RANGO.IP.PRIVADO.120:5280/xmpp-websocket;
#IP servidor jitsi
proxy_http_version 1.1;
proxy_set_header Upgrade $http_upgrade;
proxy_set_header Connection "upgrade";
proxy_set_header Host $host;
tcp_nodelay on;
}

access_log /var/log/nginx/jitsi.dominio.edu.ar/access.log;
error_log /var/log/nginx/jitsi.dominio.edu.ar/error.log;

}
Habilitamos esta configuración en nuestro servidor
$ ln -s /etc/nginx/sites-available/jitsi.dominio.edu.ar.conf /etc/nginx/sites-enabled/jitsi.dominio.edu.ar.conf
Para evitar un posible problema de memoria que puede surgir de la adición de nombres de servidores adicionales a nuestra configuración, es necesario ajustar un solo valor en el archivo /etc/nginx/nginx.conf. Abrí el archivo:
$ nano /etc/nginx/nginx.conf
Encontrá la directiva server_names_hash_bucket_size y descomentá la línea.
Guardamos los cambios y reiniciamos nginx
$ systemctl restart nginxEditamos un archivo para nuestra configuración /etc/nginx/sites-enabled/jitsi.dominio.edu.ar.conf
types {
# nginx's default mime.types doesn't include a mapping for wasm
application/wasm wasm;
}

server {
listen 80;
server_name jitsi.dominio.edu.ar;

set_real_ip_from RANGO.IP.PRIVADO.100;
# IP del Proxy
real_ip_header X-Real-IP;

set $prefix "";

root /usr/share/jitsi-meet;

# ssi on with javascript for multidomain variables in config.js
ssi on;
ssi_types application/x-javascript application/javascript;

index index.html index.htm;
error_page 404 /static/404.html;

gzip on;
gzip_types text/plain text/css application/javascript application/json image/x-icon application/octet-stream application/wasm;
gzip_vary on;
gzip_proxied no-cache no-store private expired auth;
gzip_min_length 512;

location = /config.js {
alias /etc/jitsi/meet/jitsi.dominio.edu.ar-config.js;
}

location = /external_api.js {
alias /usr/share/jitsi-meet/libs/external_api.min.js;
}

# ensure all static content can always be found first
location ~ ^/(libs|css|static|images|fonts|lang|sounds|connection_optimization|.well-known)/(.*)$
{
add_header 'Access-Control-Allow-Origin' '*';
alias /usr/share/jitsi-meet/$1/$2;

# cache all versioned files
if ($arg_v) {
expires 1y;
}
}

# load test minimal client, uncomment when used
#location ~ ^/_load-test/([^/?&:'"]+)$ {
# rewrite ^/_load-test/(.*)$ /load-test/index.html break;
#}
#location ~ ^/_load-test/libs/(.*)$ {
# add_header 'Access-Control-Allow-Origin' '*';
# alias /usr/share/jitsi-meet/load-test/libs/$1;
#}

location ~ ^/([^/?&:'"]+)$ {
try_files $uri @root_path;
}

location @root_path {
rewrite ^/(.*)$ / break;
}

# Anything that didn't match above, and isn't a real file, assume it's a room name and redirect to /
location ~ ^/([^/?&:'"]+)/(.*)$ {
set $subdomain "$1.";
set $subdir "$1/";
rewrite ^/([^/?&:'"]+)/(.*)$ /$2;
}

}
Configurar el nombre de host
El nombre del servidor debe ser un subdominio como “jitsi.dominio.edu.ar”. En primer lugar, debemos comprobar el nombre de host en /etc/hosts y cambiarlo cuando sea necesario.
$ hostnamectl set-hostname jitsi.dominio.edu.ar
Luego editamos el archivo/etc/hosts:
127.0.0.1 localhost.localdomain localhost
x.x.x.x jitsi.dominio.edu.ar jitsi
Nota: x.x.x.x es la IP pública de nuestro servidor.
Finalmente en el mismo equipo probamos que se puede hacer ping al dominio:
ping "$(hostname)"
Si todo funciona correctamente, deberíamos ver: jitsi.dominio.edu.ar
Configuramos el firewall
Los siguientes puertos tienen que estar abiertos en el firewall para permitir el tráfico al servidor Jitsi Meet:
- 80 TCP – para la verificación / renovación del certificado SSL con Let’s Encrypt
- 443 TCP – para el acceso general a Jitsi Meet
- 10000 UDP – para comunicaciones generales de vídeo/audio en red
- 22 TCP – si accedes a tu servidor usando SSH (cambia el puerto en consecuencia si no es el 22)
- 3478 UDP – para consultar el servidor stun (coturn, opcional, necesita cambiar config.js para habilitarlo)
- 5349 TCP – para comunicaciones de video/audio en red a través de TCP (cuando UDP está bloqueado, por ejemplo), servido por coturn
Si estás usando ufw, podés usar los siguientes comandos:
sudo ufw allow 80/tcp
sudo ufw allow 443/tcp
sudo ufw allow 10000/udp
sudo ufw allow 22/tcp
sudo ufw allow 3478/udp
sudo ufw allow 5349/tcp
sudo ufw enable
Verificamos el estado del firewall con:
sudo ufw status verboseAñadimos el repositorio jitsi a los orígenes de software para que los paquetes de Jitsi Meet estén disponibles.
curl https://download.jitsi.org/jitsi-key.gpg.key | sh -c 'gpg --dearmor > /usr/share/keyrings/jitsi-keyring.gpg'
echo 'deb [signed-by=/usr/share/keyrings/jitsi-keyring.gpg] https://download.jitsi.org stable/' | tee /etc/apt/sources.list.d/jitsi-stable.list > /dev/null
Actualizamos
$ apt update
Nota: El instalador comprobará si Nginx o Apache están presentes (en ese orden) y configurará un host virtual dentro del servidor web que encuentre para servir a Jitsi Meet.
Si ya tenemos Nginx escuchando en el puerto 443 en la misma máquina, la configuración del servidor turn se omitirá ya que entrará en conflicto con su actual puerto 443.
$ apt install jitsi-meet
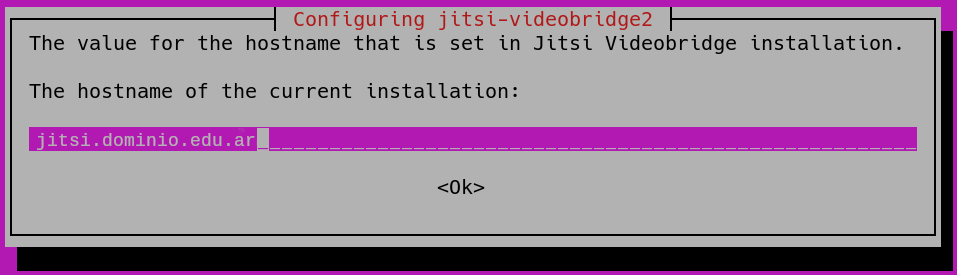
Nombre de host: Introducimos el nombre de host de la instancia de Jitsi Meet. Si tenés un dominio, utilizá el nombre de dominio específico, por ejemplo: jitsi.dominio.edu.ar.
Este nombre de host se utilizará para la configuración del virtualhost dentro de Jitsi Meet y también es la que se utilizará para acceder a las conferencias web. 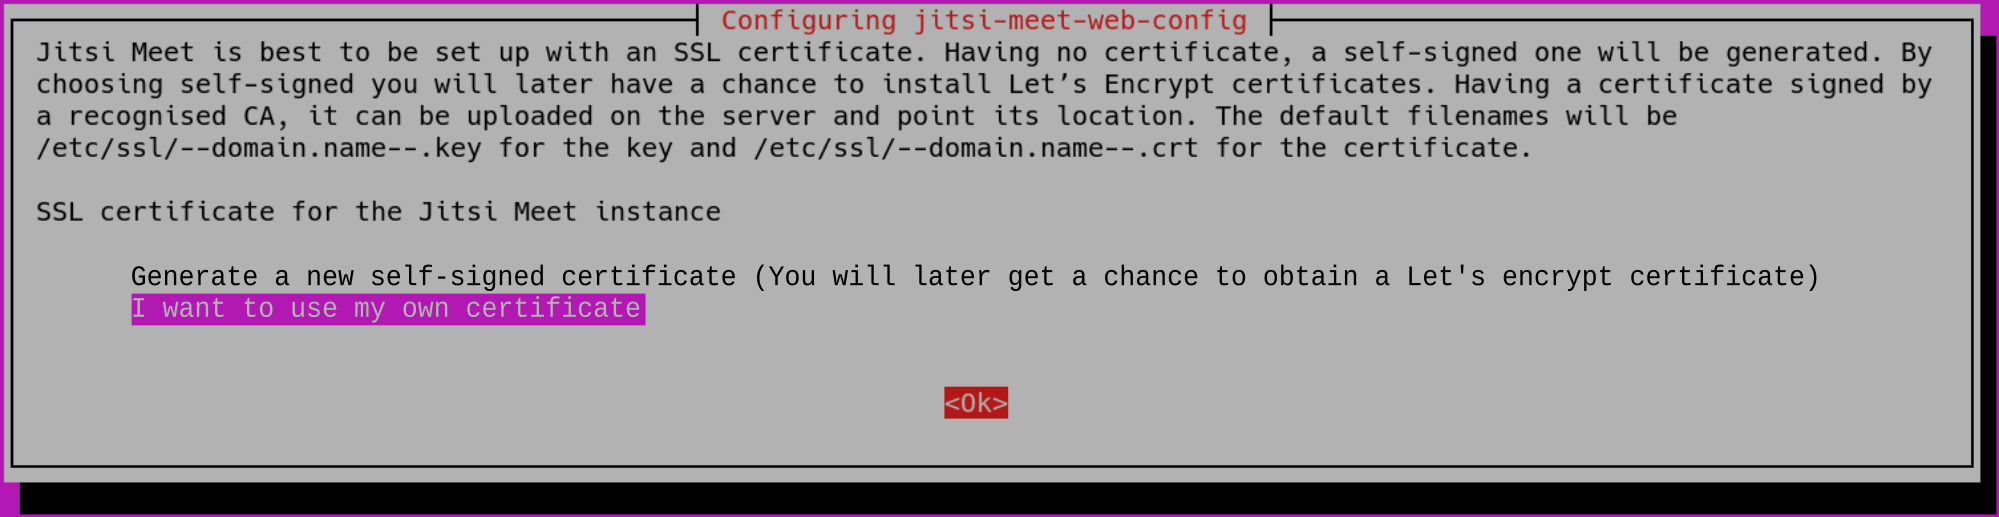
Generación de certificados SSL/TLS: Se te preguntará sobre la generación de certificados SSL/TLS. Vamos a elegir la opción Quiero usar mi propio certificado (I want to use my own certificate):
Configuración avanzada
Si la instalación está en una máquina detrás de NAT, jitsi-videobridge debería configurarse automáticamente en el arranque. Si las llamadas de tres vías no funcionan, se necesita una configuración adicional de jitsi-videobridge para que sea accesible desde el exterior.
Siempre que todos los puertos requeridos sean enrutados (reenviados) a la máquina en la que se ejecuta, estos puertos son (TCP/443 o TCP/4443 y UDP/10000).
Es necesario añadir las siguientes líneas adicionales al archivo /etc/jitsi/videobridge/sip-communicator.properties:
org.ice4j.ice.harvest.NAT_HARVESTER_LOCAL_ADDRESS=<Dirección.IP.local>
org.ice4j.ice.harvest.NAT_HARVESTER_PUBLIC_ADDRESS=<Dirección IP pública>
Y comentar el org.ice4j.ice.harvest.STUN_MAPPING_HARVESTER_ADDRESSES existente.
Consultar la documentación de ice4j para más detalles.
Systemd/Límites: Los despliegues predeterminados en sistemas que utilizan systemd pueden tener valores bajos por omisión para los procesos máximos y los archivos abiertos. Si el puente utilizado espera un mayor número de participantes, los valores por defecto deben ser ajustados (los valores por defecto son buenos para menos de 100 participantes).
Para actualizar los valores editamos /etc/systemd/system.conf y nos aseguramos de que tenemos los siguientes valores, solo los actualizamos si son menores.
DefaultLimitNOFILE=65000
DefaultLimitNPROC=65000
DefaultTasksMax=65000
Para comprobar los valores sólo hay que ejecutar
systemctl show --property DefaultLimitNPROC
systemctl show --property DefaultLimitNOFILE
systemctl show --property DefaultTasksMax
Detalles de systemd
Para recargar los cambios de systemd en un sistema en funcionamiento ejecutamos systemctl daemon-reload y systemctl restart jitsi-videobridge2. Para comprobar la parte de las tareas ejecute sudo systemctl status jitsi-videobridge2 y debería ver Tasks: XX (límite: 65000). Para comprobar la parte de archivos y procesos ejecutamos cat /proc/`cat /var/run/jitsi-videobridge/jitsi-videobridge.pid`/limits y deberías ver
Max processes             65000                65000                processes
Max open files            65000                65000                files
Confirmá que tu instalación está funcionando
Inicie un navegador web e ingresá el nombre de host o la dirección IP del paso anterior en la barra de direcciones.
Asegurate que podés crear una reunión y que los demás participantes pueden unirse a la sesión.
Si todo esto ha funcionado, ¡felicidades! Tenés un servicio de conferencia Jitsi operativo.
La configuración predeterminada de jitsi puede funcionar bien con pocos participantes, pero a medida que el número aumenta, algunos de ellos pueden experimentar problemas y caídas (no debido al servidor Jitsi, sino a las limitaciones de ancho de banda y hardware en el lado del cliente): por omisión, cada cliente codifica (y envía al servidor) múltiples capas de flujo de vídeo y, al mismo tiempo, recibe las de todos los demás a una resolución ideal de 720p.Los cambios son hechos en nano /etc/jitsi/meet/$(hostname -f)-config.js, puede ser necesario descomentar algunas opciones.
Después de guardar los ajustes, siempre hay que reiniciar los servicios jitsi para aplicarlos: systemctl restart jicofo && systemctl restart jitsi-videobridge2.
Cambiar el idioma predeterminado
Es posible que quieras cambiar el idioma predeterminado de la interfaz, si te encuentras en un país donde no se habla inglés.
Los usuarios pueden seguir eligiendo su idioma preferido en la configuración del cliente.
defaultLanguage: 'en'
Cambiar el nombre de la sala
sed -i 's/"headerTitle":"Jitsi Meet"/"headerTitle":"Sala de Reuniones"/g' /usr/share/jitsi-meet/libs/app.bundle.min.js
sed -i 's/"headerTitle": "Jitsi Meet"/"headerTitle": "Sala de Reuniones"/g' /usr/share/jitsi-meet/lang/main-es.json
sed -i 's/"headerTitle": "Jitsi Meet"/"headerTitle": "Sala de Reuniones"/g' /usr/share/jitsi-meet/lang/main-esUS.json
Algunas variables de idioma pueden estar ausentes en /usr/share/jitsi-meet/lang/main-esUS.json, basta con agregarlas.
"welcomepage": {
...
"headerTitle": "Sala de Reuniones",
"headerSubtitle": "Comunicaciones seguras y de alta calidad",
Si queremos permitir que se graben las conversaciones, en el archivo anterior, descomentámos:
localRecording: {
enabled: true,
format: ‘ogg’
},
Forzar a los usuarios a establecer un nombre para mostrar
Para identificar fácilmente quién está hablando se puede forzar a los usuarios a elegir un nombre para mostrar.
requireDisplayName: true
RECOMENDADO: habilitar la suspensión de capas
Es posible que desee suspender las capas de vídeo no utilizadas hasta que se soliciten de nuevo, para ahorrar recursos tanto en el servidor como en los clientes.
active enableLayerSuspension: true
RECOMENDADO: Limitar la resolución de vídeo
Para ahorrar recursos tanto en el servidor como en los clientes.
Por ejemplo: establecer resolución: 480 (y descomentar si es necesario); descomentar toda la sección constraints: y establecer ideal: 480, max: 480
RECOMENDADO: Limitar el número de señales de vídeo reenviadas
Podemos limitar el número de transmisiones de vídeo enviadas a cada cliente, para ahorrar recursos tanto en el servidor como en los clientes. Como el ancho de banda y la CPU de los clientes pueden no soportar la carga, esta configuración puede evitar retrasos y caídas.
Esta función se encuentra de manera predeterminada en otras aplicaciones de conferencia web, dónde el límite está establecido en 4.
Lee cómo funciona en la documentación oficial de Jitsi y la evaluación del rendimiento en este estudio.
Establecer el número de canales de vídeo sin silenciar channelLastN: 4 (y descomentar si es necesario)
OPCIONAL: Desactivar las cámaras web al inicio
Es posible desactivar todos los canales de vídeo al inicio para ahorrar recursos tanto en el servidor como en los clientes. Para ello, estaclecer
startAudioOnly: true
OPCIONAL: Desactivar las cámaras web después de X participantes
Podemos limitar el inicio de las transmisiones de vídeo a partir de cierto número de participantes.
startVideoMuted: 10
OPCIONAL: Desactivar los micrófonos al inicio
Para mantener el orden podemos iniciar la conferencia con todas las fuentes de audio desactivadas.
La opción startWithAudioMuted establecida a true desactiva la entrada de audio al unirse.
OPCIONAL: Desactivar los micrófonos después de X participantes
Podemos limitar algunas fuentes de audio al inicio para mantener el orden. Definimos el número de microfonos que no estarán silenciados de manera predeterminada.
startAudioMuted: 10
Es posible ajustarlo a gusto, cambiar el fondo o algún color, el logo… y así tendremos nuestro servicio totalmente listo:
- Cambiar logo, sustituir el archivo /usr/share/jitsi-meet/images/watermark.svg
- Para cambiar la imagen de fondo: en el /usr/share/jitsi-meet/css/all.css buscar ‘.welcome{background-image:’ y ponerle url(../images/FONDO.jpg)
- Para cambiar el color del texto del Título: .header .header-text-title{color:#XXXXXX;
- Para cambiar el color del texto del Home: .header .header-text-description{display:inherit;color:#XXXXXX;
- Para cambiar el color del boton: .welcome .welcome-page-button{width:51px;min-width:inherit;height:35px;font-size:14px;font-weight:inherit;background:#XXXXXX;
- Cambiar el color del cuadrado de las ultimas reuniones: .welcome .header .tab-container{font-size:16px;position:relative;text-align:left;min-height:354px;width:710px;background:#XXXX;
- Para cambiar el color al pasar el ratón sobre la reunión seleccionada en la zona central: .item.with-click-handler:hover{background-color:#XXXXXX}
- Para cambiar el color del texto del nombre de las reuniones: .meetings-list{font-size:14px;color:#XXXXXX
Cambiar el color de texto de “Comenzar una reunion”: .enter-room-input-container{width:100%;padding:0 8px 5px 0;text-align:left;color:#XXXXXX;
Pre requisitos de instalación
- Módulo ALSA Loopback – Configurar para cargar en el arranque, cargar en el kernel en ejecución y confirmar
echo "snd-aloop" >> /etc/modules
 modprobe snd-aloop
 lsmod | grep snd_aloop
- Google Chrome estable
curl -sS -o - https://dl-ssl.google.com/linux/linux_signing_key.pub | apt-key add
 echo "deb [arch=amd64] http://dl.google.com/linux/chrome/deb/ stable main" > /etc/apt/sources.list.d/google-chrome.list
 apt-get -y update
 apt-get -y install google-chrome-stable
- Políticas gestionadas por Chrome
mkdir -p /etc/opt/chrome/policies/managed echo ‘{ “CommandLineFlagSecurityWarningsEnabled”: false }’ >>/etc/opt/chrome/policies/managed/managed_policies.json - Google Chromedriver
CHROME_DRIVER_VERSION=`curl -sS chromedriver.storage.googleapis.com/LATEST_RELEASE`
 wget -N http://chromedriver.storage.googleapis.com/$CHROME_DRIVER_VERSION/chromedriver_linux64.zip -P ~/
 unzip ~/chromedriver_linux64.zip -d ~/
 rm ~/chromedriver_linux64.zip
 mv -f ~/chromedriver /usr/local/bin/chromedriver
 chown root:root /usr/local/bin/chromedriver
 chmod 0755 /usr/local/bin/chromedriver
- Paquetes miscelaneos
apt-get install ffmpeg curl alsa-utils icewm xdotool xserver-xorg-video-dummy
- Instalar Jibri
- Si se instala en el mismo servidor que Jitsi:
apt-get install jibri
Si se instala en un servidor diferente:
wget -qO - https://download.jitsi.org/jitsi-key.gpg.key | apt-key add -
sh -c "echo 'deb https://download.jitsi.org stable/' > /etc/apt/sources.list.d/jitsi-stable.list"
apt update && apt install jibri -y
- Añadir Jibri a los grupos de usuarios necesarios
usermod -aG adm,audio,video,plugdev jibri
- Instalar el SDK de Java
apt install openjdk-11-jdk
- Podemos predeterminar la versión instalada; o
update-alternatives --config java
Sólo hay una alternativa en el grupo de enlaces java (provee /usr/bin/java): /usr/lib/jvm/java-11-openjdk-amd64/bin/java
Nada que configurar.
- Modificar “launch.sh”
nano /opt/jitsi/jibri/launch.sh
- Reemplazar la palabra “
java” con la ruta completa/usr/lib/jvm/java-11-openjdk-amd64/bin/java
Configuración
Configurar Prosody
- Abrir el cfg.lua de prosody
nano /etc/prosody/conf.avail/dominio.edu.ar.cfg.lua
- Agregar lo siguiente al final del archivo
-- internal muc component, meant to enable pools of jibri and jigasi clients Component "internal.auth.dominio.edu.ar" "muc" modules_enabled = { "ping"; } storage = "memory" muc_room_cache_size = 1000 VirtualHost "recorder.dominio.edu.ar" modules_enabled = { "ping"; } authentication = "internal_plain" - Crear cuentas – ‘jibri’ y ‘recorder’ (elije tus propias contraseñas, pero anótalas para más adelante)
prosodyctl register jibri auth.dominio.edu.ar ClaveJ
prosodyctl register recorder recorder.dominio.edu.ar ClaveR
Configurar Jicofo
- Abrir jicofo/sim-communicator-properties
nano /etc/jitsi/jicofo/sip-communicator.properties - Agregar las siguientes lineas
org.jitsi.jicofo.jibri.BREWERY=JibriBrewery@internal.auth.dominio.edu.ar
org.jitsi.jicofo.jibri.PENDING_TIMEOUT=90
Configurar Jitsi Meet
- Abrir config.js
nano /etc/jitsi/meet/dominio.edu.ar-config.js
- Definir las siguientes propiedades:Con la última versión estable estas dos opciones
fileRecordingsEnabled: true,
liveStreamingEnabled: true,
Son reemplazadas por el bloque
recordingServicerecordingService: { enabled: true, // sharingEnabled: false, // hideStorageWarning: false, }, hiddenDomain: 'recorder.dominio.edu.ar',
Configuración adicional del sistema
- Abrir el puerto 5222 en caso que Jibri esté instalado en un servidor separado de Jitsi
ufw allow 5222/tcp
- Crear un directorio para almacenar las grabaciones y asignar la propiedad del directorio a jibri
mkdir /srv/grabaciones
chown jibri:jibri /srv/grabaciones
Configurar jibri.conf
Prestar mucha atención a esta configuración porque es la responsable de cerca del 90% de los problemas reportados sobre el funcionamiento de Jibri.
- Abrir el archivo jibri.conf
nano /etc/jitsi/jibri/jibri.conf - Copiar y pegar la siguiente configuración en tu archivo jibri.conf (clic en la flecha de abajo para visualizar los detalles de la configuración), asegurándote de editar para reflejar tu nombre de dominio y las contraseñas registradas anteriormente en Prosody para los usuarios “jibri” y “recorder”
jibri {
// A unique identifier for this Jibri
// TODO: eventually this will be required with no default
id = ""
// Whether or not Jibri should return to idle state after handling
// (successfully or unsuccessfully) a request. A value of ‘true’
// here means that a Jibri will NOT return back to the IDLE state
// and will need to be restarted in order to be used again.
single-use-mode = false
api {
http {
external-api-port = 2222
internal-api-port = 3333
}
xmpp {
// See example_xmpp_envs.conf for an example of what is expected here
environments = [
{
name = "prod environment"
xmpp-server-hosts = ["dominio.edu.ar"]
xmpp-domain = "dominio.edu.ar"

control-muc {
domain = "internal.auth.dominio.edu.ar"
room-name = "JibriBrewery"
nickname = "jibri-nickname"
}

control-login {
domain = "auth.dominio.edu.ar"
username = "jibri"
password = "ClaveJ"
}

call-login {
domain = "recorder.dominio.edu.ar"
username = "recorder"
password = "ClaveR"
}

strip-from-room-domain = "conference."
usage-timeout = 0
trust-all-xmpp-certs = true
}
]
}
}
recording {
recordings-directory = "/srv/grabaciones"
# TODO: make this an optional param and remove the default
finalize-script = "/ruta/para/finalizar.sh"
}
streaming {
// A list of regex patterns for allowed RTMP URLs. The RTMP URL used
// when starting a stream must match at least one of the patterns in
// this list.
rtmp-allow-list = [
// By default, all services are allowed
".*"
]
}
ffmpeg {
resolution = "1920x1080"
// The audio source that will be used to capture audio on Linux
audio-source = "alsa"
// The audio device that will be used to capture audio on Linux
audio-device = "plug:bsnoop"
}
chrome {
// The flags which will be passed to chromium when launching
flags = [
"--use-fake-ui-for-media-stream",
"--start-maximized",
"--kiosk",
"--enabled",
"--disable-infobars",
"--autoplay-policy=no-user-gesture-required",
"--log-file=/var/log/jitsi/jibri/chromedriver.log",
"--ignore-certificate-errors"
]
}
stats {
enable-stats-d = true
}
webhook {
// A list of subscribers interested in receiving webhook events
subscribers = []
}
jwt-info {
// The path to a .pem file which will be used to sign JWT tokens used in webhook
// requests. If not set, no JWT will be added to webhook requests.
# signing-key-path = "/path/to/key.pem"

// The kid to use as part of the JWT
# kid = "key-id"

// The issuer of the JWT
# issuer = "issuer"

// The audience of the JWT
# audience = "audience"

// The TTL of each generated JWT. Can't be less than 10 minutes.
# ttl = 1 hour

}
call-status-checks {
// If all clients have their audio and video muted and if Jibri does not
// detect any data stream (audio or video) comming in, it will stop
// recording after NO_MEDIA_TIMEOUT expires.
no-media-timeout = 30 seconds

// If all clients have their audio and video muted, Jibri consideres this
// as an empty call and stops the recording after ALL_MUTED_TIMEOUT expires.
all-muted-timeout = 10 minutes

// When detecting if a call is empty, Jibri takes into consideration for how
// long the call has been empty already. If it has been empty for more than
// DEFAULT_CALL_EMPTY_TIMEOUT, it will consider it empty and stop the recording.
default-call-empty-timeout = 30 seconds

}
}
- Finalmente, reiniciar todos los servicios y configurar Jibri para que se inicie en el arranque
systemctl restart jitsi-videobridge2 prosody jicofo
systemctl enable --now jibri
Jibri es el instrumento de grabación y transmisión de las conferencias Jitsi Meet. Sus capacidades incluyen:
- Grabar una reunión Jitsi, capturando tanto el audio como el vídeo
- Transmitir en directo una reunión Jitsi (a través de cualquier RTMP)
Entender cómo funciona Jibri te ayudará a saber qué buscar cuando tengas problemas con él.
Jibri funciona como cualquier otro participante en una reunión. Entra a la reunión como un usuario oculto (sin enviar audio o vídeo propio) y graba la reunión (screencasting), más o menos de la misma manera que usarías una grabadora de pantalla para grabar eventos en tu pantalla.
Jibri realiza el screencasting uniéndose a la reunión como cualquier otro participante y luego grabando la reunión desde su propia pantalla (“monitor”). Esto es importante porque, entre otras cosas, significa que al igual que un participante puede tener problemas en una reunión mientras que todos los demás están bien, Jibri también puede tener problemas, sin embargo, una conferencia Jitsi Meet se ejecutará con éxito y otros participantes no se verán afectados.
Una cosa importante a tener en cuenta: Jibri sólo puede grabar una reunión a la vez. Esto significa que necesitas una instancia de Jibri para cada reunión que necesites grabar.
Solución de Problemas
Hay dos mensajes que es probable que recibas cuando tu grabación no se inicia como se esperaba:
- Todas las grabadoras están actualmente ocupadas – Esto sucede cuando todos los Jibris disponibles están siendo utilizados. Recuerda que Jibri sólo puede grabar una reunión a la vez, por lo que si tu grupo de Jibris disponibles está en uso, no podrás grabar hasta que haya uno disponible. Y es entonces cuando recibes este mensaje
- Grabación no disponible – Este es un mensaje de error. Es el mensaje genérico que obtienes cuando algo está realmente mal con Jibri – normalmente te dice que Jibri no está correctamente instalado o configurado. Es importante tener en cuenta que obtendrás este mismo mensaje de error en tu pantalla cuando Jibri no funcione por cualquier razón que no sea que las grabadoras disponibles estén ocupadas. Así que el mensaje de error en sí no es muy específico. Sin embargo, el momento en que aparece el mensaje de error puede ser muy instructivo.

Hay algunas cosas que podrían ir mal, pero por muy complicado que parezca Jibri, lo bonito es que sólo hay un puñado de lugares donde esas cosas podrían ir mal. Esto hace que la resolución de problemas sea relativamente menos penosa.
Consejos
La grabación falla inmediatamente
Recuerda que Jibri es un participante de la reunión también. Eso significa que el primer problema que podría tener Jibri podría ser el de entrar en la sala de reuniones. De hecho, una GRAN pista que sugiere que esta es la causa de tu problema con el Jibri es que cuando haces clic en el comando “Comenzar a grabar”, INSTANTANEAMENTE recibes ese mensaje de error. Si la grabación falla inmediatamente, comprueba lo siguiente:
Jibri.conf
- Verifica cuidadosamente tu archivo Jibri.conf (/etc/jitsi/jibri/jibri.conf). Este es tu archivo de configuración principal para Jibri y el área donde ocurren la mayoría de los errores. Este archivo estará prácticamente vacío cuando instales Jibri por primera vez, así que tienes que rellenarlo. Si no fue completado, Jibri fallará instantáneamente.
- Usa el archivo de ejemplo/referencia para rellenar tu jibri.conf. Asegúrate de completar la sección xmpp usando el ejemplo de xmpp.
- En la sección xmpp, asegúrate de introducir correctamente los nombres y las contraseñas elegidas al crear las cuentas correspondientes para Jibri en Prosody (“jibri” y “recorder”). Verifica y vuelve a verificar que realmente has introducido los nombres de usuario y las contraseñas correctamente. Para hacerlo:
Comprueba el nombre y la contraseña de la grabadora registrada
grep password /var/lib/prosody/recorder*/accounts/recorder.dat
sed -n '/call.login/, /}/p' /etc/jitsi/jibri/jibri.conf | grep password
Comprueba el nombre de usuario y la contraseña registrados en jibri
grep password /var/lib/prosody/auth*/accounts/jibri.dat
sed -n '/control.login/, /}/p' /etc/jitsi/jibri/jibri.conf | grep password
- Si has creado previamente un archivo config.json (versión anterior de Jibri), no te limites a copiar y pegar el contenido de ese archivo en tu jibri.conf; necesitas extraer los valores reales ya que los nombres de los campos son ligera – pero significativamente – diferentes. [Ten en cuenta que config.json está siendo reemplazado, por lo que es mejor mover tus configuraciones a jibri.conf, si no lo has hecho ya. Una vez que lo hagas, borra el archivo config.json].
Carpeta de registro de Jibri
Esto es algo inusual, pero vale la pena notarlo. Sólo he visto que ocurra cuando he desinstalado y vuelto a instalar Jibri, pero ¿quién sabe? De todos modos, si has confirmado que todo está bien con tu jibri.conf, ve a “/var/log/jitsi” y confirma que tienes un directorio llamado “jibri” allí. Si no lo tienes, crea uno y asegúrate de que Jibri puede escribir en él (haz que jibri sea el propietario). Si falta este directorio o si está presente pero Jibri no tiene permisos para acceder a él, Jibri fallará instantáneamente. También asegúrate de que jibri es parte de todos los grupos necesarios:
usermod -aG adm,audio,video,plugdev jibri
La grabación falla después de unos segundos
Esto difiere significativamente de un mensaje de error instantáneo. En este caso, aparece un mensaje emergente avisando de que Jibri se está “preparando para grabar la reunión”

Pero luego, unos segundos o varios segundos después, esa ventana emergente es reemplazada por la ventana de error.
En este caso, a menudo sugiere que Jibri puede haber sido capaz de entrar en la reunión, pero no estaba configurado correctamente, por lo que es incapaz de iniciar la grabación. En casos como este, incluso no es inusual tener una carpeta creada en el directorio de grabación, pero la carpeta sólo contendrá un metadata.json sin un archivo mp4 real. Cuando esto ocurra, comprueba lo siguiente:
Jibri.conf
- Sí, de nuevo, jibri.conf. Si de hecho has completado tu archivo jibri.conf, pero tienes los valores equivocados o has cometido un error, esta podría ser la razón. Lo que ocurre es que se está leyendo la configuración (de ahí la pausa) y cuando se descubre que las credenciales son incorrectas, entonces se lanza el mensaje de error. De nuevo, haz todas las comprobaciones indicadas anteriormente en Jibri.conf y corrige cualquier error descubierto.
Propiedades del comunicador Sip (Jicofo)
- Comprueba las configuraciones de Jicofo para jibri para asegurarte de que las has introducido correctamente:
nano /etc/jitsi/jicofo/sip-communicator.properties
- Confirma que has añadido las siguientes líneas:
org.jitsi.jicofo.jibri.BREWERY=JibriBrewery@internal.auth.dominio.edu.ar
org.jitsi.jicofo.jibri.PENDING_TIMEOUT=90
- ¡ASEGÚRATE DE CAMBIAR “dominio.edu.ar” POR EL NOMBRE DE TU SUBDOMINIO JITSI!
Archivo cfg.lua (Prosody)
- Comprueba la configuración de tu prosody (lua)
nano /etc/prosody/conf.avail/dominio.edu.ar.cfg.lua
Asegúrate de que has añadido este bloque al final del archivo:
--internal muc component, meant to enable pools of jibri and jigasi clients
Component “internal.auth.meet.dominio.edu.ar” “muc”
modules_enabled = {
“ping”;
}
storage = “memory”
muc_room_cache_size = 1000

VirtualHost “recording.dominio.edu.ar 100”
modules_enabled = {
“ping”;
}
authentication = “internal_plain”
- Una vez más, asegúrate de editarlo para reflejar tu subdominio Jitsi.
Se pudo grabar pero el mp4 está corrupto (no se puede abrir)
Esto suele deberse a un error de la versión de Java. Jibri requiere OpenJDK 11 para funcionar correctamente.
- Comprueba que has instalado OpenJDK 11 en tu sistema.
java -versión
Si tienes otra versión (más actual) de Java instalada, esa será la que aparezca cuando compruebes tu versión de java.
Para comprobar si hay varias versiones de java en su sistema:
update-alternatives --config java
Esto debería listar todas las versiones. Asegúrate de ver la siguiente línea como una de las opciones:
/usr/lib/jvm/java-11-openjdk-amd64/bin/java
Ahora, asegúrese de establecer la variable de entorno java home correcta. Abre el archivo launch.sh
nano /opt/jitsi/jibri/launch.sh
sustituye “java” por la ruta completa “/usr/lib/jvm/java-11-openjdk-amd64/bin/java”
Por último, SIEMPRE reinicia Jibri cuando hagas cualquier cambio de configuración. Esto es más a menudo la causa de los errores de lo que se cree.
Otros posibles problemas:
- insuficiencia de recursos
al menos 4 núcleos / 4 GB RAM para un servidor Jibri separado
al menos 8 núcleos / 8 GB RAM si Jitsi y Jibri están en el mismo servidor - el módulo missing snd_aloop faltante
Algunos kernel cloud no soportansnd_aloop. Es necesario cambiar a un kernel estandar en este caso. - certificado TLS autofirmado para jitsi
Agregar--ignore-certificate-errorsa los flags de Chrome en este caso
    chrome {
        flags = [
            "--use-fake-ui-for-media-stream",
            "--start-maximized",
            "--kiosk",
            "--enabled",
            "--disable-infobars",
            "--autoplay-policy=no-user-gesture-required",
            "--ignore-certificate-errors"
        ]
    }
- Inaccesible
TCP/5222
Si jibri está en un servidor separado,TCP/5222debe estar abierto en jitsi - Dirección de jitsi irresoluble
jibri debe resolver la dirección del host jitsi correctamente - Directorio de grabación inexistente
El directorio de grabación debe existir - Directorio de grabación no escribible
El usuariojibridebe poder escribir en el directorio de grabación - Entorno de escritorio ya instalado
Jibri tiene su propio entorno de escritorio. Si ya hay uno instalado, esto puede causar algunos problemas. - Jitsi no funciona
No comiences a instalar Jibri antes de tener un Jitsi completamente funcional. No olvides testearlo con al menos 3 participantes.